

Installing .Net Framework 3.5 in Windows 8 offline
Tips and Tricks, Windows, Windows 8
The arrival of Windows 8 has really bought in a lot of new features and at the same time, forgot to implement the old ones which presented difficulty to many users of the cyber world. One among the many major problem users would face is the omission of .Net framework 3.5 and older versions from the OS. That doesn't mean, of course, you can simply install the programs that needs .Net even if it is not present. The thing is -- If you want .Net Framework 3.0, you gotta install it seperately when the need comes and yes, it must be done online. So, if you already tried to install a program and are getting the error relating .Net Framework, then this is your problem.
Even if you have the installation package somewhere, it most probably wouldn't work and that means you are forced to do it online. We are not talking about a small add-on here as the package costs more than 100 MBs, a problematic problem to many people who doesn't have an internet connection. However, there is still a way to do this without internet connection with the help of the Windows 8 Installation media. In this post, I'll show you how with the help of Windows' Command Prompt and the installation media.
 |
| If your Windows 8 doesn't have .Net 3.5 installed, you get this dialog box. |
Inside the Windows 8 Installation media, all the necessary installers are present which are not installed during Windows 8 installation and normally, not visible to common folk. That means it includes the .Net Framework package too. However, you can't directly approach and install like you normally do. With the help of Windows' Deployment Image Servicing and Management Tool (or DISM tool), we can install this package onto Windows 8 and thus, continue using the programs that requires the older .Net versions.
---------------------------------------
1. Run command prompt as Administrator. You can do this by right-clicking on the lower-left corner of the screen and choosing Command Prompt (Admin).
2. Insert the Windows 8 installation media to the computer or if you are having Windows 8 image, mount it using Daemon Tools or extract it to a folder on any drive.
3. Now, copy-paste the code given below onto the command prompt:
dism /online /enable-feature /featurename:NetFx3 /all /source:<w8_setup_drive>\sources\sxs
4. Change the highlighted part of the code to the path of Windows 8 installation directory or drive. i.e, DRIVELETTER:\DIRECTORY\sources\sxs Omit the directory part if you inserted or mounted the installation media and just give the driveletter: at the highlighted region. (If you still don't get it, see the attached image for a sample run of the code).
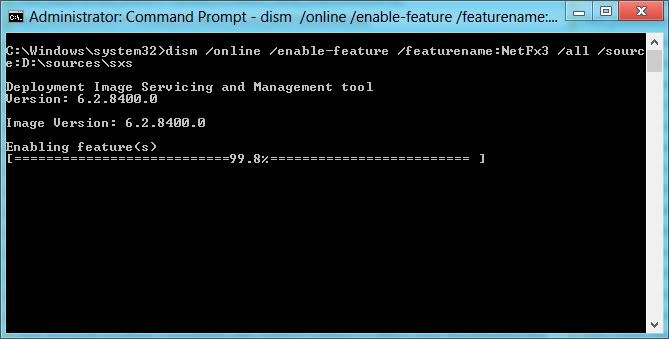 |
| Running DISM Tool in command prompt. See the code to know the format. |
5. The DISM Tool will start and it will take a few while to install. Don't remove the installation media before completion. Once that's done, reboot the system. That's it! Now, you can install programs based on .Net Framework 3.5 and older versions on your Windows 8 device.
---------------------------------------
Hope you enjoyed the tutorial. This works for all versions of Windows 8 (not RT, RT doesn't support programs anyway) and it even works for the Release Preview or Developer Preview version. If you're having problem running the code, do leave a comment below and I'll see what I can do. Stay tuned for more Windows 8 stuff. :)
Advertisements
Share this story


